Sunday, July 17, 2011

Voodoo Dressing

Another one of my random finds.  I actually don't remember where I came across this recipe.

This dressing is phenomenal.  I tossed it with cold, shredded rotisserie chicken and served it on warm naan bread with sliced tomatoes and feta cheese, with garlic-stuffed olives and marinated mushrooms on the side.  Awesome dinner!

You could do so much with the dressing.  Just over a regular salad, or you could toss it with shredded pork or beef.  Adam and John had the suggestion of pairing it with rice or pasta.  So, very versatile stuff.

And, as always, I made some changes to the recipe.  I've noted with an * the ingredients that were in the original recipe or noted in (_) what others changes I made.

You will need:

  • 2 Tablespoons Dijon Mustard
  • 2 Tablespoons lime juice
  • 2 Tablespoons chili paste *  (I didn't have this and couldn't find it at the store.  However, it would make this dressing even better, I think.)
  • 1 Tablespoon crushed red peper
  • 1/3 cup mayonaise
  • 3/4 cup olive oil
  • 1/2 cup white wine vinegar (I used red wine vinegar)
  • 1/4 cup soy sauce 
  • 3/4 cup of sugar (This seemed excessive.  I used 1/2 cup).
  • 2 Tablespoons minced garlic
  • 2 Tablespoons ginger*  (I didn't use this at all)
Put everything into your blender and mix until smooth.  Do with it what you will.  

Trust me.  It is good.

Tuesday, July 5, 2011

1L-Alison's Salsa Chicken

This dinner idea came to me from my dear friend, Alison.  It is incredibly simple and extremely delicious.  I didn't know it was going to be this good, so I did not take pictures.  But trust me - this is YUMMY!

You will need:

Boneless, skinless chicken breasts
Jar of salsa of your choice, enough to cover the chicken.  (I used a Medium Garlic Lovers salsa)
Shredded cheese (I used the Kraft 5 CHeese Mexican Blend)
Sour Cream
Tortillas (optional)


What to do:

1) Put chicken and salsa in crock pot.  Make sure salsa is covering chicken.
2)  Cook until the chicken starts to fall apart. (For me today that was an hour or so on high, then about 3-4 hours on low).
3)  Remove chicken.
4)  Shred the chicken and return to crock pot.
5) Cook for another hour or two on low.
6)  Empty chicken and salsa from crock pot into baking dish.
7)  Cover with shredded cheese.
8)  Bake in a 350° oven until cheese is melty and bubbly.
9)  That's it.  You're done!

Tonight I served this with tortillas and sour cream and it was fabulous!  Next time, I will be serving it over cilantro-lime rice.

Try this!  You will not be disappoint!  Again, many thanks to Alison for this one!

Monday, May 30, 2011

Chicken Paprikash with Dumplings

I first made this a couple of months ago, before I started my blog.  I had gotten a craving for Chicken and Dumplings and went searching for a recipe.  I came across this recipe for Chicken Paprikash with Dumplings, thought it looked interesting and decided to give it a try.  After all, who could forget the scene in 'When Harry Met Sally':  "Waiter, there is too much pepper in my paprikash...."

So, let's get started.....

You will need the following:


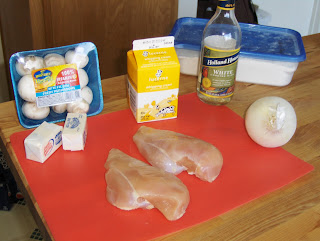
  • Chicken.  The recipe as written called for 4 pounds of chicken.  That's a lot of chicken.  I'm only cooking for 2 1/2, so the first time I made this I used 2 bone-in, skin-on thigh/drumsticks.  It was greasy as hell (but the skin was delicious).  This time, I just used 2 skinless, boneless breasts.  That worked just fine and cut down on the grease factor.
  • A white onion
  • Mushrooms, sliced.
  • Minced garlic.
  • Butter 
  • Paprika  (Note:  I used regular paprika.  I have been told that smoked paprika is spicier, but I haven't tried it yet.)
  • Salt & pepper
  • Sour cream
And for the dumplings, you will need:

  • 2 cups flour
  • 1 egg
  • water
  • Salt & pepper

So, let's make some Paprikash!

1.  Cook your onion, mushrooms, and garlic in your butter.  I used about 4 tbsp of butter, but that may have been a bit much.

2.  Once your onions and mushrooms have softened a bit, add water to your pot.  You need a fair amount of water to make your dumplings (more on this later).  I filled it up about 2/3 full, but that was WAY too much.  I should have only done 1/2 way or so.  However, I think if you are using more chicken, then use more water.  Make sense?  Okay, on with the show...
3.  Put your chicken in the pot.  I left the breasts intact for the initial cooking.

4.  Season with salt, pepper, and paprika.  You will need a LOT more paprika that you think you need, especially if you're using a lot of water.

5.  Heat everything to boiling, lower the heat, cover the pot and let it rapidly simmer for an hour.  Is 'rapidly simmer' a term?  You want it on the verge of boiling.  Enough so that it reduces, but not so much that it burns or sticks.
6.  While that is cooking for an hour, go veg in front of the T.V.  Law & Order is probably on.
7.  After an hour, it's time to make the dumplings......
8.  Mix 2 cups of flour, an egg, salt, pepper, and some water together to make a sticky dough.  I ended up using about a cup of water, but I would suggest you start with 1/4 cup and gradually add from there if you need it.  You want the dough to be very sticky.

9.  Now, this is where I deviate from the written recipe (well, and the mushrooms, but I digress).  The recipe says to make your dumplings in a separate pot of boiling water.  This makes no sense to me because 1) It's an extra pot you have to clean, and 2) I would think that by cooking the dumplings in the chicken broth you've made that they would have extra flavor.  So, that's what I did - I made them in the same pot.  However, feel free to use an extra pot if you want - you would need it full of boiling water.
10.  Bring your chicken pot up to boiling.  Take a spoonful of dumpling dough.  I used a dessert/teaspoon/whatever, as a tablespoon would have made really big dumplings. You want your dumplings to be on the smaller side so they will cook completely.

11.  Dip your spoon of dumpling dough into the boiling broth.  The dumpling should slide right off, but don't worry if a little residual dough sticks to the spoon.

12.  Continue making dumplings until all your dough is gone.  The dumplings should float when they are cooked.
13.  Remove the chicken and shred the meat.

14.  Put the shredded meat back in the pot.
15.  Add more salt, pepper, and paprika.
16.  Reduce heat to simmering and let cook for an hour, letting more of the liquid reduce.

17.  You can stir some sour cream into the paprikash before serving, or you can let everyone add their own if they want.  I, of course, added lots of sour cream - yummy!


This was the second time I've made this dish, and I still found it to be rather bland.  I don't know if I'm using the wrong kind of paprika, or not enough, or if there is something else I'm missing.  It was still very good, though, and I hope you enjoy it!

Wednesday, April 27, 2011

Italian Stuffed Shells

Much like the Tomato-Feta Tarts are my signature appetizer, the Italian Stuffed Shells are one of my signature entrees.  These were the first meal I ever cooked for Adam, and are typically what I bust out whenever we have people over for dinner.  These can be finicky to make, but totally worth the effort!  We had our friends Brandee and Shelby and their sweetie daughter Reese over to dinner on Saturday and, of course, I just had to make my shells!

Let's get started!

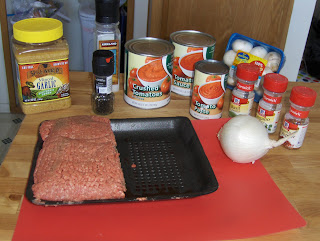
I'm feeling rather disjointed at the moment (it's been a strange week), so I've broken everything up into sections:  The meat filling/sauce, the cheese filling, and the shell construction.  First off, let me give you the complete ingredient list:

  • Ground beef - around 2 pounds
  • Onion - chopped
  • Minced garlic
  • Big can of crushed tomatoes (the 29 oz can, I think)
  • Can of tomato sauce - 15 ounce
  • Can of tomato paste
  • 1 egg - beaten
  • 1 container ricotta cheese
  • Shredded mozzarella cheese
  • Whatever other shredded Italian cheese you like - I use Kraft 5 Cheese Blend
  • 1 package of jumbo pasta shells - cooked according to package instructions and cooled.


Meat Filling and Sauce!

To prepare the meat filling/sauce:
1)  Brown your ground beef with your onions and garlic as normal.  Drain off the grease.
2)  In your sauce pot, mix the ground beef with the can of tomato sauce and half the can of tomato paste.
3)  Season to your liking with oregano, basil, salt, and pepper.
4)  Simmer on low eat for 15 minutes or so.  This mixture should be very thick, so stir frequently to keep it from burning.

5)  Once the flavors have blended, remove half of the meat mixture into a separate pot and continue to keep warm on low (again, make sure it doesn't burn).  This is going to be the filling for some of your shells.
6)  In the remaining meat mixture, add in the can of crushed tomatoes.  Stir well, and simmer on low for at least 30 minutes, or until you are ready to put your shells together.


The Cheese Filling!

What to do:
1)  Blend the egg, ricotta, half of the mozzarella, and however much of your other cheese(s) you want in a bowl.  Add some salt, pepper, and parsley if you want.
2)  Congratulate yourself on a job well done.


Shell Construction!  

It's time to put everything together!

If you haven't already done so, please take this opportunity to cook your pasta shells according to the package directions.  Go ahead.  We'll wait.  Oh, and make sure they're cool, too.  I don't want you burning your hands.  But remember - never, ever rinse off pasta in cold water.

You will need a large baking dish.  Personally, given the mess level, I just buy an aluminum roasting pan, like what you use for turkeys.  Wasteful it may be, but well worth the $2.99 to not have to deal with the clean up factor. 

What to do:
1.  Put a layer of your sauce on the bottom of the pan.  Ideally, there should be no pan showing through, but don't make it too thick.

2.  Take a shell, and fill it with either the meat filling or cheese filling.
3.  Place it in the pan.

4.  Repeat until the pan is full.  I usually do half-pan meat filled and half-pan cheese filled.

5.  Cover the shells with the remaining sauce.

6.  Top with your remaining mozzarella and any of your other cheeses that are left.

7.  Bake at 350° for 30 minutes.  Cover with aluminum foil for the first 15 minutes or so.  For a pretty color to the cheese, broil for just a couple of minutes before serving.

I was so excited to have the Thompsons over that I forgot to take a picture of the finished dish - my bad! But trust me, it was gorgeous and delicious.  I hope you enjoy it as much as we did!

Monday, April 18, 2011

Zucchini Bread

I loves me some zucchini bread!  It stems back from when I was a kid and my mom decided she wanted to grow zucchini.  And she grew a LOT of zucchini.  So much, in fact, that we had bags and bags of zucchini in the freezer.  It was taking over!  Argh!

So, my mom baked zucchini bread.  A lot of zucchini bread.  And I loved it!  I would heat it with some butter and extra raisins..... yummy!
I got a craving for it a few months ago, and came across this recipe.  It's really good and I follow it almost exactly (strange, I know).

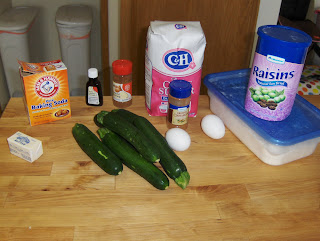
You will need:

  • 2 eggs, beaten
  • 1 1/3 cup sugar
  • 2 teaspoons vanilla
  • 3 cups (or so) grated fresh zucchini
  • 2/3 cup melted butter
  • 2 teaspoons baking soda
  • Pinch of salt
  • 3 cups flour
  • 1/2 teaspoon nutmeg
  • 2 teaspoons cinnamon
  • Raisins
  • (optional add-ins are walnuts, pecans, and cranberries)
So, let's have some fun!

1.  Heat your oven to 350°.
2.  Grate your zucchini.

2.  In a large bowl, mix together the eggs, sugar and vanilla.

3.  Mix in your zucchini and melted butter.

4.  Sprinkle in a pinch of salt and your baking soda.
5.  Add your flour a cup at a time.

6.  I add in the cinnamon and nutmeg after the first batch of flour.  This way you can be sure the flavors are blended well.

7.  Keep adding your flour, mixing well.  And while you're add it, mix in your raisins or whatever you're using.


8.  Your batter should look something like this:

9.  Spoon into a well-buttered loaf pan.  This recipe should make 2 5x9 loaves.

10.  Bake at 350° for about an hour.  Start checking for doneness at 50 minutes.  Bread is done when a tooth pick inserted in the middle comes out clean.  Cool in pan for 10 minutes.  Turn out onto wire racks to cool throughly.


Enjoy!

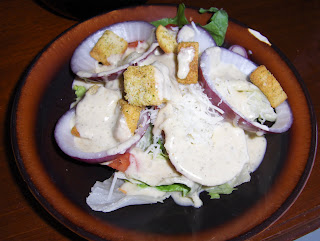
Not-Quite-Olive-Garden's-Salad-Dressing

I love Olive Garden's Salad Dressing.  Love, love, love it!  Say what you will about the rest of their food, but I could live for a long time on their fried raviolis, salad, and breadsticks.

I went searching to see if I could find a recipe for the dressing.  In case you didn't know, there are websites devoted to reproducing recipes from restaurants, like CopyKat.com, and allrestaurantrecipes.com.  I don't remember exactly where I found this one, but it was supposedly done by Food Network people.  I figured it was worth a shot.

This isn't exactly like Olive Garden's dressing, but it still really good.  I did have to make a few changes to the recipe though, so if you follow it exactly maybe it would turn out better.

You will need:

The recipe as it was written called for:

  • 1/4 cup Extra Virgin Olive Oil
  • 2 tablespoons white wine vinegar
  • 3 tablespoons Miracle Whip
  • 1 tablespoon lemon juice
  • 2 tablespoons grated parmesan cheese
  • 1/4 teaspoons garlic salt
  • 1/2 teaspoon dried Italian seasoning
  • 1-2 tablespoons of water
The changes I made:
  • I didn't have white wine vinegar.  I used red wine vinegar instead.  I figured that was preferable to using regular white vinegar.
  • I don't use Miracle Whip very often.  Usually just in my casseroles.  So, our jar was really, really expired.  Like more than 6 months expired.  So, I used Mayo instead.
  • I used minced garlic instead of the garlic salt.
What you need to do:
1.  Put all your ingredients in  a blender or food processor.

2.  Blend well.  
3.  Refrigerate for at least an hour before serving.


Note:  This will keep in the fridge for a couple of day.  However, before serving, give it a quick spin in the blender.

There are other variations of the recipe that I will try in the future, but this one is actually pretty good.  I hope you enjoy!

Allison's World Famous Spaghetti

World Famous?  Surely that can't be, you scoff!  Why, yes it is true, I reply.  And don't call me Shirley.

Okay, okay.  Maybe, just maybe, "World Famous" is a bit of a stretch.  But it is true that I served this to people when I lived in England, and they all loved it.  Well, except for my ex-mother-in-law, who was a drunk and accused me of putting "little green trees" into the sauce.  For what it's worth, she was talking about the oregano. 

So, on with Allison's Somewhat-Recognizable-And-Enjoyed-By-A-Few-People-Here-And-In-The-UK Spaghetti....

You will need:

  • Ground Beef - depends on how meaty you like your sauce.  This is just under 2 pounds.
  • Big can (29 oz, I think) Tomato Sauce
  • Big can Crushed Tomatoes
  • 12 oz can of Tomato Paste
  • Onion - chopped
  • Mushrooms - sliced
  • Minced garlic
  • Oregano
  • Basil
  • Salt
  • Pepper
  • Crushed red pepper flakes
And away we go...

1.  Put your beef, mushrooms, onions, and garlic in a large pot and brown on medium heat until meat is no longer pink.

2.  Drain the grease.
3.  In your large pot, add your meat, tomato sauce, crushed tomatoes, and tomato paste.  Stir.
4.  Add your spices.  As much or as little as you like.  

5.  Mix well and add in some water (half a can or so).
6.  Bring to boil and then reduce heat.  Simmer on low-medium for at least an hour, preferably longer.
7.  Serve over pasta of your choice.

I hope you enjoy this!  And trust me - the "little green trees" are delicious!

Tuesday, April 12, 2011

Chicken in White Wine and Cream Sauce

When I lived in England, one of my favorite meals was white rice with white wine and cream sauce.  Healthy, right?  No chicken (too expensive), just rice and sauce.  And butter.  The sauce I would use came in a little blue (I think.  Or maybe it was green.) can, and I would pour the sauce into a Pyrex dish, bake it for half an hour or so (until it got really thick and gooey) and pour it over rice.  And there was dinner.

Since coming back to the States 13 years ago, I have tried many a version of white wine and cream sauce, attempting to find something remotely close to the yummy stuff I used to buy at Tesco.  I've never come even close to finding it.

And I still haven't.

Don't get me wrong; this wasn't terrible.  It was, however, bland.  That could have had something to do with the fact, though, that the recipe called for tarragon.  I don't have tarragon, I don't use tarragon, and I wasn't going to buy it just for the sake of one recipe.  So, yeah, the blandness may have been my fault.  Or maybe it would have been bland regardless.

I will be making this again, once I figure out a way to liven it up a bit.  But here's the basics...

You will need:

  • Skinless, boneless chicken breasts.  I cut mine up into chunks as usual, but you can leave yours whole if you want.  
  • Onion, chopped.
  • Mushrooms, sliced.
  • 1 pint of whipping cream
  • White cooking wine.
  • Butter - the recipe called for 6 tablespoons.  That's a lot of butter, especially with the cream.
  • Flour
  • Salt and pepper
  • Tarragon (as per the recipe.  I did not use it.)

Ready, set.... cook!

1.  Melt your butter in a heavy skillet.
2.  Coat your chicken pieces in flour seasoned with salt and pepper (and tarragon if you choose).
3.  Brown your chicken in the butter.

4.  Add your chopped onion and sliced mushrooms to the pan.  Pour in some white cooking wine.  Don't be stingy, now.

5.  Cover and simmer for 10-15 minutes, or until the chicken is cooked.

6.  Add the pint of cream.  Stir in some flour (in small increments) to help thicken the sauce.  Stir frequently to avoid lumps.  Be careful not to add too much, as the sauce will thicken as it cooks and stands.  I panicked and stirred in some corn starch as well.  Yeah, it got pretty thick.

7.  Cook over medium heat until sauce is as thick as you would like it.  Serve over noodles or rice.

I hoep you all enjoy this!  Please, if you try it, let me know what you think should be done to jazz it up a bit (Adam suggested leaving out the onion and mushrooms and adding peas.  Yeah, I married a strange one.)

Sunday, April 10, 2011

Wil Wheaton's Black Bean Soup

Occasionally, I will stumble across recipes in strange places.  For example, the tomato-feta tart recipe was found in a novel.  The recipe for the Black Bean Soup was found on Wil Wheaton's blog.  See, I follow Wil on Twitter because, yes, I am just that much of a geek.  A couple of weeks ago, he posted this recipe on his blog and it caught my eye.  You can find the original blog post here:  http://wilwheaton.typepad.com/wwdnbackup/2011/03/soup-black-bean-hot.html

A note on Wil Wheaton.  I had a huge crush on him growing up (Stand By Me, anyone?  And Star Trek: TNG, ring a bell?).  These days, I enjoy seeing him whenever he pops up on Big Bang Theory.  I also truly enjoy following him on Twitter, and find his blog posts to be exceptionally intelligent and well-written.  In short, I heart him.

So, on with the soup.  In true Allison fashion, I did make a change to the recipe, but for the most part this is strictly Mr. Wheaton's creation, and I bow to him in thanks.

You will need:

  • A can of black beans.
  • One chipotle pepper. (Or more if you want, who am I to judge?)
  • An onion.
  • Minced garlic.
  • A lime.
  • Tomatoes.  Normally I would have used Romas, but the ones at the store were gross and my plant hasn't started producing yet.  So, I had to use these.
  • Olive oil.
  • A can of corn.  The addition of corn was my change to the recipe, so if you don't like that part, blame me.
  • Cumin.
  • Oregano.
  • Salt and pepper.

What to do:
1)  Chop up your onion and garlic, and sauté them in olive oil until translucent in a sauce pan.

2)  Add your cumin, stir well, and continue to cook for a few minutes.
3)  Chop up your tomatoes.

4)  Shake your can of beans, open, and add to the pot.  Stir.

5)  Add the tomatoes.  Stir.

6)  Chop up your chipotle(s) and add to the pot, along with some oregano.

7)  Juice your lime right over the pot.  That's right, squeeze the bitch until it begs for mercy.

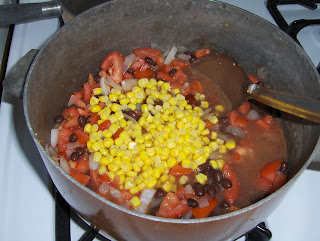
8)  Drain the can of corn and add to soup.  Stir well.

9)  Add salt and pepper if desired, a small amount of water (I used half of the corn can) and simmer for 20 minutes or so until the beans are tender.

10)  Enjoy!  I added a dollop of sour cream to mine and it was wonderful!  (picture before the sour cream, obviously)


George Carlin & Cooking

Every time I refer to or hear about a "pre-heated oven", I think of George Carlin.  While he was definitely not for everyone's taste, I loved the man and he is sorely missed.  In fact, had Eleanor been born on May 12th instead of May 11th, she would have been named Carlin, as the 12th was his birthday.

So, in honor of the man, and regarding pre-heated ovens:

That's another complaint of mine - too much use of this prefix "pre". It's all over the language now — "pre"-this, "pre"-that, place the turkey in a "pre-heated" oven. It's ridiculous! There are only two states an oven can possibly exist in: Heated or unheated! "Pre-heated" is a meaningless fucking term!

Tomato-Feta Tarts

My signature appetizer!  These are great for parties, potlucks, etc.  They are best served warm from the oven, if possible, but very good cold as well.

You will need: 

  • Puff pastry.  You can buy it in sheets, as I've done (Pepperidge Farm sells it 2 sheets per package), or you can buy the pre-made puff pastry shells.  I've never worked with the shells, so I don't know well they would work.  You also get less per package for more money, so save yourself some money and get the sheets.  I can generally get about 20 tarts from 2 sheets of pastry.  Make sure the pastry is at room temperature when you start working with it.  You will cry bitter tears if it is not.
  • Red onion(s).
  • Tomatoes.  I prefer Roma tomatoes.  They slice prettier.
  • Olive oil.
  • Balsamic vinegar.
  • Feta cheese crumbles.
Let the fun begin:

1.  Slice your onion into thinnish strips.  

2.  Gently cook the onions over medium-low (More low than medium, but higher than low.  If that makes any sense.) heat in a coating of olive oil.  You're going to cook them for at least an hour, stirring frequently.  Make sure they don't burn or get too brown.  You want them to lose their color and be limp and slimy.


3.  After 30 minutes or so, add a sprinkling of sugar and a couple of splashes of balsamic vinegar.  Mix well, and keep cooking the onions on medium-low.
4.  The onions will be done after another 30 minutes or so.  You want them nice and caramelized (blurry picture, sorry).
5.  While your onions are cooking, you can start working with your pastry!
6.  Lay out your pastry sheet on a lightly floured surface.  (Side note:  I LOVE our new butcher block island!)
7.  I use a drinking glass to cut out the rounds (that's about the size you want), but you can do whatever your want.  If you're really brave, you can try and freehand them.  I'm a wuss, so I use a glass.

8.  Keep going until you have a lot of pastry scraps left over.

9.  Knead the scrap together and use a rolling pin (or a vodka bottle) to roll out the remaining dough and keep making rounds.

10.  Once you've made all your rounds, layer them with wax paper and put them in a baggie.  Put your onions in a tupperware dish.  Make sure you have your tomatoes and Feta with you.  Get in your car and drive an hour north.  OK, OK, you can probably skip this step, but in our story tonight, that's what happened.  It was Joe's surprise birthday party, and I started the tarts here at home and then finished them up there.

11.  Once you're ready to bake your tarts, preheat your oven to 350° degrees.  (Insert George Carlin quote here.)

12.  Slice your tomatoes.

13.  Mound a small amount of onions on each round (probably a tablespoon or so), and place a tomato slice on top of the onion.

14.  Bake at 350° for about 20 minutes, or until the pastry puffs up and turns a light golden brown.


15.  Sprinkle on the feta crumbles (as much or as little as you like).  Serve warm from the oven if possible.  Thanks to Adam for taking the picture of the finished product while I was cleaning up!

I received many compliments on these at the party and I hope you enjoy them just as much!